Monday, November 9, 2015
Do you like PowerCLI and NSX? Add Layer 3 VDR/LDR capabilities to esxcli / PowerCLI
Long time no write. I've been working with a quite a few customers recently and have been working on developing PowerCLI checks so that customers do not have to login to SSH terminals for every host to run NSX Sanity Checks. Remember to "Connect-VIServer" first!
PowerCLI version of "net-vdl2 -l"
netvdl_query.ps1
This will provide Format-Table outputs of Esxcli responses from all connected hosts in the targeted clusters. It lets you verify your VNI's are connected, online, and that controller connections are proper.
Namespaces queried:
$esxcli.network.vswitch.dvs.vmware.vxlan.get()
$esxcli.network.vswitch.dvs.vmware.vxlan.list()
$esxcli.network.vswitch.dvs.vmware.vxlan.network.list(vxlanvds)
$esxcli.network.ip.interface.list("vxlan")
$esxcli.network.ip.interface.ipv4.get()
PowerCLI C:\pcli\nsx> .\netvdl2_query.ps1 Physical
hivemind.united.earth
VXLAN Global States:
ControlplaneOutOfSync UDPport
--------------------- -------
No 8472
VXLAN VDS:
GatewayIP GatewayMAC MTU NetworkCount SegmentID VDSID VDSName VmknicCount
--------- ---------- --- ------------ --------- ----- ------- -----------
192.168.24.1 ff:ff:ff:ff:ff:ff 9000 9 192.168.24.0 28 2c 38 50 93 cc 28 37-8e 56 33 cd 7c 1a ea cf nsxswitch 2
VTEP VMKNIC:
Enabled ExternalID MACAddress MTU Name NetstackInstance OpaqueNetworkID OpaqueNetworkType PortID Portgroup
------- ---------- ---------- --- ---- ---------------- --------------- ----------------- ------ ---------
true N/A 00:50:56:6f:ca:99 9000 vmk1 vxlan N/A N/A 67108979 N/A
true N/A 00:50:56:68:17:93 9000 vmk2 vxlan N/A N/A 67108980 N/A
AddressType DHCPDNS IPv4Address IPv4Broadcast IPv4Netmask Name
----------- ------- ----------- ------------- ----------- ----
STATIC false 192.168.24.4 192.168.24.255 255.255.255.0 vmk1
STATIC false 192.168.24.7 192.168.24.255 255.255.255.0 vmk2
VXLAN VNI:
ARPEntryCount ControlPlane ControllerConnection MACEntryCount MulticastIP PortCount VXLANID
------------- ------------ -------------------- ------------- ----------- --------- -------
0 Enabled (multicast proxy,ARP proxy) 192.168.1.90 (up) 2 N/A (headend replication) 1 5001
0 Enabled (multicast proxy,ARP proxy) 192.168.1.90 (up) 2 N/A (headend replication) 2 5000
0 Enabled (multicast proxy,ARP proxy) 192.168.1.90 (up) 2 N/A (headend replication) 2 5006
0 Enabled (multicast proxy,ARP proxy) 192.168.1.90 (up) 2 N/A (headend replication) 1 5007
0 Enabled (multicast proxy,ARP proxy) 192.168.1.90 (up) 0 N/A (headend replication) 1 5002
0 Disabled 0.0.0.0 (down) 0 0.0.0.0 1 5004
0 Disabled 0.0.0.0 (down) 0 0.0.0.0 1 5005
0 Enabled (multicast proxy,ARP proxy) 192.168.1.90 (up) 2 N/A (headend replication) 2 5003
0 Enabled (multicast proxy,ARP proxy) 192.168.1.90 (up) 1 N/A (headend replication) 2 5009
Next up is a PowerCLI check to make sure a vdrPort exists on your hosts, Please note this script defaults to using "nsxswitch" as the DV Switch Name to Check, and VNI 5000, you can alter the script or specify the switch name and VNI manually as parameters. This script is useful in making sure your hosts haven't encountered the "Would Block" issue which can affect both VTEP, and LIF creation.
This verifies that a VDR instance has at least been created and was my initial work around to the net-vdr tool not being exposed by esxcli. It specifically looks for the "vdrPort" instance on your DV Switch.
vdrPort_check.ps1
PowerCLI C:\pcli\nsx> .\vdrPort_check.ps1 Physical nsxswitch 5001
hivemind.united.earth
1 vdrPort was found
hivemind2.united.earth
1 vdrPort was found
hivemind3.united.earth
1 vdrPort was found
Now to the bread and butter of the post. ESXCLI-NETVDR, have you wanted insight into your LDR/VDR instances on your hosts via PowerCLI but been left hanging because the Layer 3 information is no where to be found? The following VIB will let you get what you need! This allows access to a specific subset of net-vdr commands within ESXCLI, and more important extended into PowerCLI via the Get-ESXCLI object. Unfortunately at this time it is only CommunitySupported.
esxcli-netvdr.vib
It creates the following namespaces under ESXCLI:
network.vdr
network.vdr.nbr
network.vdr.route
network.vdr.lif
The following commands:
network.vdr.list
network.vdr.lif.list
network.vdr.nbr.clear
network.vdr.nbr.list
network.vdr.route.list
Here it is in action from an SSH session, but this is not what it's for, it's for PowerCLI
[root@hivemind:~] esxcli network vdr list
default+edge-15
VdrName: default+edge-15
VdrId: 0x00001389
NumberOfLifs: 1
NumberOfRoutes: 1
State: Enabled
ControllerIP: 192.168.1.90
ControlPlaneIP: 192.168.1.20
ControlPlaneActive: Yes
NumUniqueNexthops: 0
GenerationNumber: 0
EdgeActive: Yes
default+edge-4
VdrName: default+edge-4
VdrId: 0x00001388
NumberOfLifs: 7
NumberOfRoutes: 10
State: Enabled
ControllerIP: 192.168.1.90
ControlPlaneIP: 192.168.1.20
ControlPlaneActive: Yes
NumUniqueNexthops: 1
GenerationNumber: 0
EdgeActive: No
So how can I use these mystical commands via PowerCLI, once the VIB is installed make sure to restart management agents, or reboot your host. The ESXCLI namespaces won't be available until hostd is restarted. In all my examples below I will query my LDR instance "default+edge-4"
Start off by connecting to your vCenter "Connect-VIServer"
Then grab an ESXCLI Object from a host.
PowerCLI C:\pcli\nsx> Connect-VIServer cosmos
Name Port User
---- ---- ----
cosmos 443 NADESICO\dieth
PowerCLI C:\pcli\nsx> $esxcli = Get-ESXCLI -VMHost hivemind.united.earth
PowerCLI C:\pcli\nsx> $esxcli.network.vdr.list()
ControlPlaneActive : Yes
ControlPlaneIP : 192.168.1.20
ControllerIP : 192.168.1.90
EdgeActive : Yes
GenerationNumber : 0
NumUniqueNexthops : 0
NumberOfLifs : 1
NumberOfRoutes : 1
State : Enabled
VdrId : 0x00001389
VdrName : default+edge-15
ControlPlaneActive : Yes
ControlPlaneIP : 192.168.1.20
ControllerIP : 192.168.1.90
EdgeActive : No
GenerationNumber : 0
NumUniqueNexthops : 1
NumberOfLifs : 7
NumberOfRoutes : 10
State : Enabled
VdrId : 0x00001388
VdrName : default+edge-4
Want a list of just your VdrNames?
PowerCLI C:\pcli\nsx> $esxcli.network.vdr.list() | Select-Object VdrName
VdrName
-------
default+edge-15
default+edge-4
How about all the connected logical interfaces? (I've selected a subset of the columns to fit into the blog)
PowerCLI C:\pcli\nsx> $esxcli.network.vdr.lif.list("default+edge-4") | FT -Property LIFName,ID,ConnectedDvs,State,Mode -AutoSize
LIFName ID ConnectedDvs State Mode
------- -- ------------ ----- ----
13880000000f Vxlan:5000 nsxswitch Enabled Routing, Distributed, Internal
138800000002 Vxlan:5001 nsxswitch Enabled Routing, Distributed, Uplink
13880000000c Vxlan:5005 nsxswitch Enabled Routing, Distributed, Internal
13880000000b Vxlan:5004 nsxswitch Enabled Routing, Distributed, Internal
13880000000a Vxlan:5002 nsxswitch Enabled Routing, Distributed, Internal
13880000000e Vxlan:5007 nsxswitch Enabled Routing, Distributed, Internal
13880000000d Vxlan:5006 nsxswitch Enabled Routing, Distributed, Internal
How about all the neighbor information for a specific LIF? (Again I've selected a subset)
PowerCLI C:\pcli\nsx> $esxcli.network.vdr.nbr.list("138800000002","default+edge-4") | FT -Property Network,Interface,Mac,SrcPort -AutoSize
Network Interface Mac SrcPort
------- --------- --- -------
172.16.10.2 138800000002 02:50:56:56:44:52 0
172.16.10.1 138800000002 00:50:56:b8:1a:d0 67108868
What if I want all LIFs neighbor information?
PowerCLI C:\pcli\nsx> $esxcli.network.vdr.lif.list("default+edge-4") | %{ $esxcli.network.vdr.nbr.list($_.LIFName,"default+edge-4") } | FT Network,Interface,Mac,SrcPort -AutoSize
Network Interface Mac SrcPort
------- --------- --- -------
172.16.254.3 13880000000f 00:50:56:b8:68:36 67108998
172.16.254.1 13880000000f 02:50:56:56:44:52 0
172.16.10.2 138800000002 02:50:56:56:44:52 0
172.16.10.1 138800000002 00:50:56:b8:1a:d0 67108868
172.16.5.1 13880000000c 02:50:56:56:44:52 0
172.16.4.1 13880000000b 02:50:56:56:44:52 0
172.16.12.1 13880000000a 02:50:56:56:44:52 0
172.16.19.2 13880000000e 00:50:56:b8:48:48 67108868
172.16.19.1 13880000000e 02:50:56:56:44:52 0
172.16.8.1 13880000000d 02:50:56:56:44:52 0
172.16.8.2 13880000000d 00:50:56:b8:33:92 67108984
Finally what if I want to clear the neighbor information?
PowerCLI C:\pcli\nsx> $esxcli.network.vdr.lif.list("default+edge-4") | %{ $_.LIFName ; $esxcli.network.vdr.nbr.clear($_.LIFName,"default+edge-4") }
13880000000f
Complete
138800000002
Complete
13880000000c
Complete
13880000000b
Complete
13880000000a
Complete
13880000000e
Complete
13880000000d
Complete
Alternatively to clear neighbor information on a per LIF basis:
PowerCLI C:\pcli\nsx> $esxcli.network.vdr.nbr.clear("13880000000f","default+edge-4")
Complete
Last but not least list all routes available via from your specific LDR/VDR instances:
PowerCLI C:\pcli\nsx> $esxcli.network.vdr.route.list("default+edge-4") | FT -AutoSize
Destination Flags Gateway GenMask Interface Origin Ref Uptime
----------- ----- ------- ------- --------- ------ --- ------
0.0.0.0 UG 172.16.10.1 0.0.0.0 138800000002 AUTO 1 551207
172.16.4.0 UCI 0.0.0.0 255.255.255.0 13880000000b MANUAL 1 1768288
172.16.5.0 UCI 0.0.0.0 255.255.255.0 13880000000c MANUAL 1 1768288
172.16.7.0 UG 172.16.10.1 255.255.255.0 138800000002 AUTO 1 551207
172.16.8.0 UCI 0.0.0.0 255.255.255.0 13880000000d MANUAL 1 1768288
172.16.10.0 UCI 0.0.0.0 255.255.255.0 138800000002 MANUAL 1 1768288
172.16.12.0 UCI 0.0.0.0 255.255.255.0 13880000000a MANUAL 1 1768288
172.16.19.0 UCI 0.0.0.0 255.255.255.0 13880000000e MANUAL 11 1768288
172.16.254.0 UCI 0.0.0.0 255.255.255.0 13880000000f MANUAL 1 1768288
192.168.1.0 UG 172.16.10.1 255.255.255.0 138800000002 AUTO 6 551207
Tuesday, June 17, 2014
NSX Controllers and VXLAN Cluster Installation
To begin we should setup an IP Pool for your NSX Controllers to automatically assign out. Login to the vCenter Web Client, select the "Networking & Security" option on the left hand side bar from the home screen. From here select the "NSX Managers" option.

From here select the IP of your NSX Manager and then select the Manage tab, and the Grouping Objects subsection, select the IP Pools grouping object, and click on the + icon to add a new IP Pool.

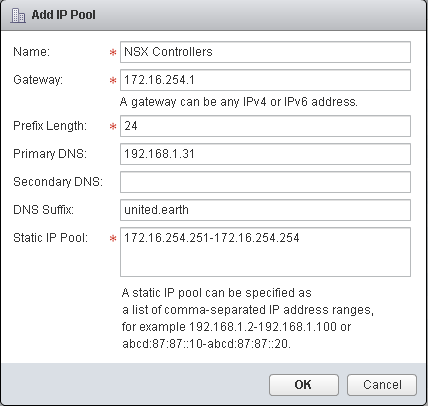
You should run the NSX controllers in sets of odd numbers starting from 3 and up. So allocate a pool with a minimum of three addresses. The Add Pool process can also be done from the directly from the next section of the NSX Controllers deployment by clicking on the "Add Pool" option within the Add Controller dialog.
With you're IP Pool configured we'll move onto defining and deploying the NSX Controllers.
You can either click on the Back button inside the vCenter WebClient or goto Home and back to "Networking & Security". Choose Installation from the left hand side menu now.


Once you're controllers are prepared, we'll be moving onto the next tab Host Preparation. This portion of the installation will push out the ESXi host side components for the Distributed Firewall, and VXLAN services.

Once you're cluster has completed setup of the NSX package and the Distributed Firewall package you will see our familiar green check mark under both Installation status, and Firewall. The installation field also keeps track of the version of the components installed.
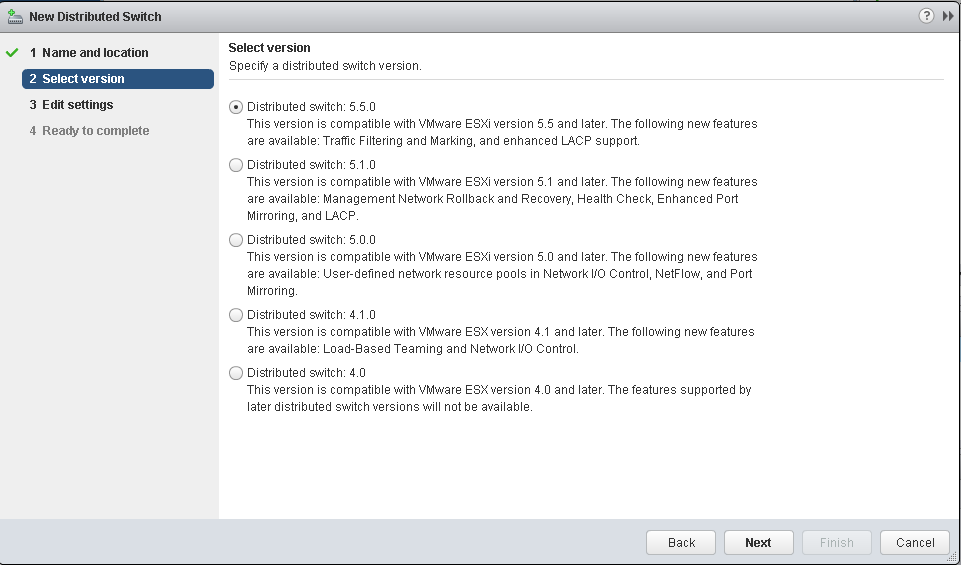
The next step requires a dvSwitch, so we're going to configure one, add hosts to it, and then come back to the installation of the VXLAN service. Click on the Home icon in the vCenter Web Client and then select the Networking inventory section.
From the Networking screen right click on your Datacenter and select New distributed switch


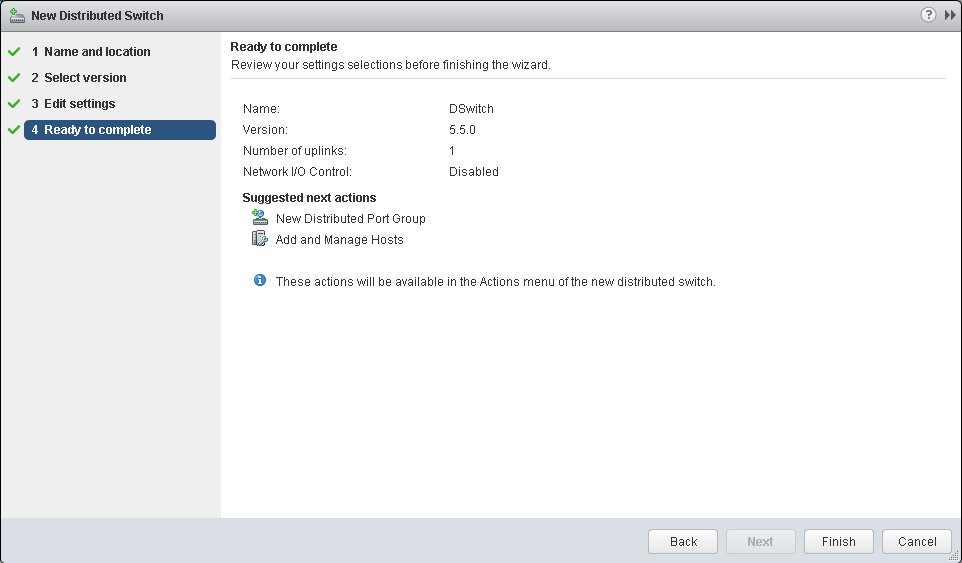
Right click on your new dvSwitch and select Add or Manage Hosts

Select Add for the operation type, and click on next.


If you are a lucky man, all your hosts are the exact same hardware with all their NIC connected the same way and you can use template mode to join the hosts.

Next select the host to use as a template.


Set the uplinks for your template host, and then hit the Apply to all

vCenter will now asses the impact! Since we are not moving VMKernel Adapters or VM, and as long as you're not stealing a physical NIC that is already backing another distributed or standard switch that holds a VMKernel Adapter your screen should be telling you No impact.


Back to the vCenter WebClient Home screen and back into Networking & Security and our Installation section, and click on the Configure option under the VXLAN column. I have already created another IP Pool through the same process we went through to create an NSX Controller IP Pool, once again the Add Pool option is also available in the IP Pool drop down. Be keen to match the VMKNic Teaming Policy with one that matches your uplinks. I have chosen explicit failover as my VXLAN will be going over a single link. Options are:
All Distributed Switch Versions:
Fail Over: which will give you an explicit fail over order and use a Active / Standby set up for all uplinks
Static Etherchannel: which will give you an Active/Active Route by IP Hash for uplinks
Load Balance - SRCID: utilizes the normal route based on originating virtual port id
Load Balance - SRCMAC: utilizes the alternate load balance algorithm based on source MAC address;
Distributed Switch 5.1:
LACP Active: which will give you route by IP Hash for uplinks
LACP Passive: which will give you route by IP Hash for uplinks; but the physical switch must be in Active state, or the Link will not be brought online.
Distributed Switch 5.5:
Enhanced LACP: Utilizes the Enhanced LACP configuration your vSphere 5.5 distributed Switch


If you set your Recent Task panel to show All Users' Tasks you should see the the an Add Virtual NIC Task for each host, along with an Add Distributed Port Group, and many Update opaque data tasks.

If you switch over to the Logical Network Preparation tab, and the VXLAN Transport section you should now see all hosts listing with a green check mark and the VMKnic IP's that have been set up as VTEP endpoints.

We're now done with the VXLAN set up. The final tab in the Installation section is Service Deployments this is used to push out VMware Endpoint, and VMware Data Security. Also as third party services are registered with NSX you will be able to deploy them from this tab. I will discuss these services in later posts.
To being adding VXLAN Logical Switches, select the Logical Switches section, and click on the green +.
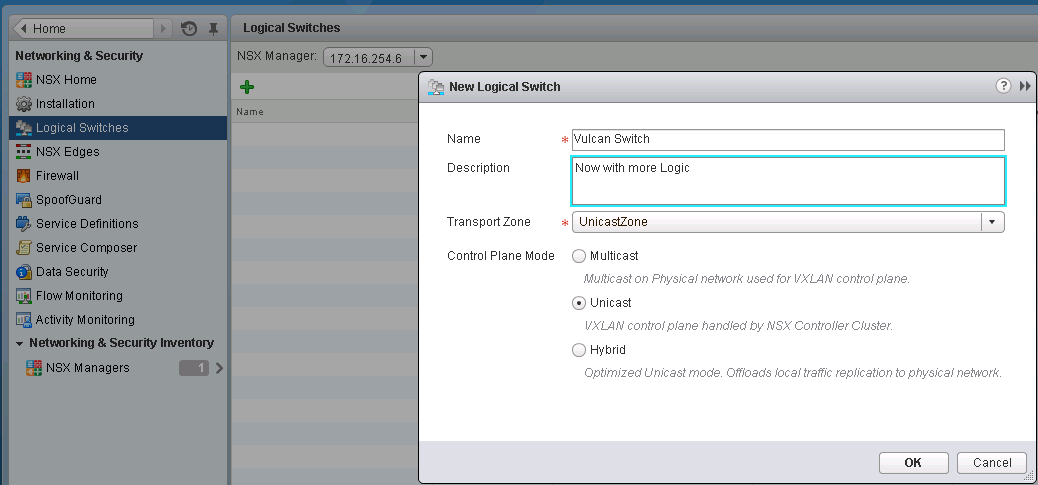
These break down to mean:
vxw is for VXLAN Wire
dvs-## is the dvs Managed object reference identifier
vlanid is the VLAN the VXLAN VTEPs are running in
UUID is a randomized unique identifier
vtepgroup is the VTEP group id the VXLAN is defined in
segmentid is the assigned segment id in use by this VXLAN wire
logical switch name is the name you assigned to the Logical switch

Next post I will cover setting up an NSX Edge as a routing point out of the VXLAN networks.
Friday, June 13, 2014
Setting up NSX-V 6.0.4
After Deploying the OVA, you will need to first sync your NSX-V Manager (Similar to the old vShield / vCloud Networking and Security Manager) up with your vCenter.
Login to the Web Interface of your NSX-V Manager

The credentials are set up when you deploy the OVA.
You'll be brought to the NSX-V Manager home screen, which contains some very useful information in the upper right hand corner you can see the IP, the version, the hostname, and the username you have currently logged in with:
 You'll want to click on the "Manage vCenter Registration" button, which will bring you to a page where you can configured both the Lookup Service and your vCenter Server. I recommend configuring the vCenter Server connection first, and then the Lookup Service. I recommend using a specifically created Service account for the NSX-V Manager connection this way any tasks initiated by NSX-V can be easily identified. The Lookup Service should be configured with your "administrator@vsphere.local" SSO account.
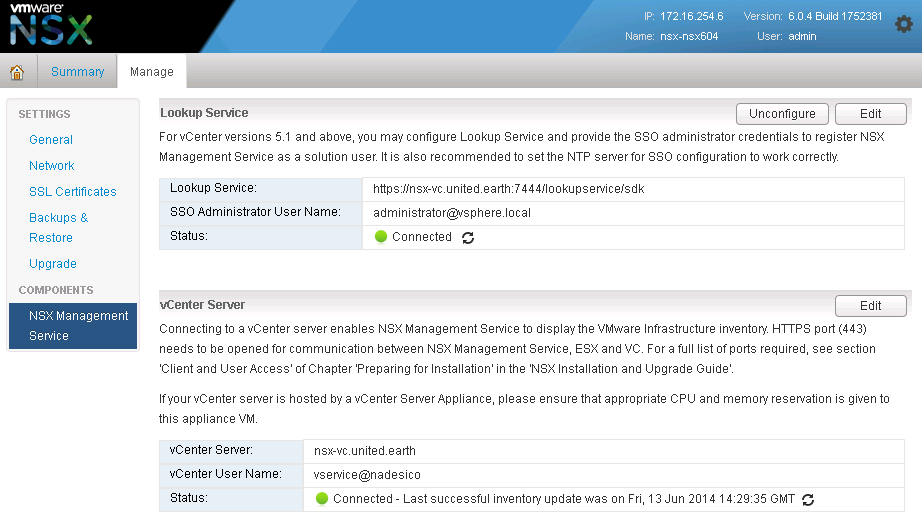
Once the vCenter Server and Lookup Service the next step is to set up Configuration Backups. You can backup to either FTP, or SFTP locations.
On the left hand side bar click on "Backups & Restore", or the "Backups & Restore" button from the NSX-V Home screen. Click on the Change button for FTP Server Settings. All fields do need to be populated in this screen unlike vShield / vCloud Networking & Security your backups do require a passphrase now. I would recommend schedule daily backups. I suggest to exclude Audit logs, System Events, Flow Records to keep the size of the backups minimal. Of course your individual needs may be different than mine so do not exclude information that you may depend on.

Your NSX-V Manager is now set up, but wait there's MORE!
We need to grant permissions to users. If you followed my recommendation you used a service account to register NSX-V Manager to your vCenter server. This will be the only vCenter level account that can actively manager the Networking & Security section in vCenter. In the next step we'll grant access to a vCenter user.
This time, login to your vCenter Web Client using the service account we used to register NSX-V to vCenter. Once authenticated and logged in Select the "Networking & Security" section, and then Select the "NSX Managers" under the "Networking & Security Inventory" section. I've highlighted this area in Yellow in my screenshot:
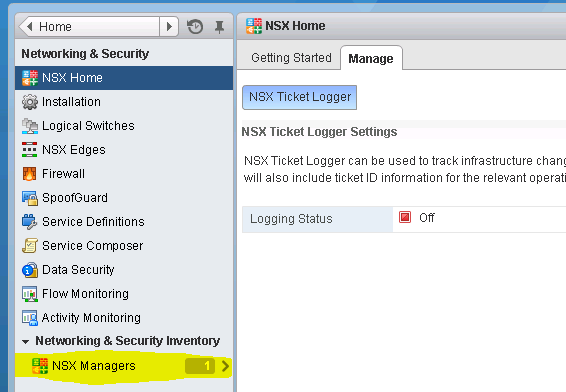
Once you click on this it will bring you to a list of the NSX Managers. Select the IP Address associated with your NSX-V Manager, and then click on the "Manage" Tab, and then select the "Users" subsection of this tab. From here you can add additional administrators to NSX-V. These users need to already be defined in vCenter.

Once you have added the accounts that you wish to allow to access NSX-V to this list they will have access to the "Networking & Security" module based upon the Role granted to the user. Now log out from the vCenter server as you were connected with the service account!
Next we'll explore setting up NSX Controllers & VXLAN
Login to the Web Interface of your NSX-V Manager
The credentials are set up when you deploy the OVA.
You'll be brought to the NSX-V Manager home screen, which contains some very useful information in the upper right hand corner you can see the IP, the version, the hostname, and the username you have currently logged in with:
Once the vCenter Server and Lookup Service the next step is to set up Configuration Backups. You can backup to either FTP, or SFTP locations.
On the left hand side bar click on "Backups & Restore", or the "Backups & Restore" button from the NSX-V Home screen. Click on the Change button for FTP Server Settings. All fields do need to be populated in this screen unlike vShield / vCloud Networking & Security your backups do require a passphrase now. I would recommend schedule daily backups. I suggest to exclude Audit logs, System Events, Flow Records to keep the size of the backups minimal. Of course your individual needs may be different than mine so do not exclude information that you may depend on.
Your NSX-V Manager is now set up, but wait there's MORE!
We need to grant permissions to users. If you followed my recommendation you used a service account to register NSX-V Manager to your vCenter server. This will be the only vCenter level account that can actively manager the Networking & Security section in vCenter. In the next step we'll grant access to a vCenter user.
This time, login to your vCenter Web Client using the service account we used to register NSX-V to vCenter. Once authenticated and logged in Select the "Networking & Security" section, and then Select the "NSX Managers" under the "Networking & Security Inventory" section. I've highlighted this area in Yellow in my screenshot:
Once you click on this it will bring you to a list of the NSX Managers. Select the IP Address associated with your NSX-V Manager, and then click on the "Manage" Tab, and then select the "Users" subsection of this tab. From here you can add additional administrators to NSX-V. These users need to already be defined in vCenter.
Once you have added the accounts that you wish to allow to access NSX-V to this list they will have access to the "Networking & Security" module based upon the Role granted to the user. Now log out from the vCenter server as you were connected with the service account!
Next we'll explore setting up NSX Controllers & VXLAN
Thursday, October 18, 2012
intro
Welcome to adventures in 3D Virtualization. - I do not represent VMWare, ASUS, Corsair, or nVidia in anyway shape or form. Please contact your graphics supplier for drivers.
We'll start off with my machine specs:
PNY GTX 560 Ti 1GB (Primary)
PNY Quadro 4000 2GB GDDR5 (Secondary)
64GB Corsair 1600mHz DDR3 (Running XMP Profile 1)
ASUS Sabertooh X79
Core i7 3930K
Issues with hardware: resolved / replaced mobo there was a bad pin on the CPU socket
DIMM_D1 and DIMM_D2 list a loaded chip as "Abnormal", same chip loads as OK in A/B/C 1/2 slots. Rotated all chips around can only get board to load with A1 B1 C1/2 filled instead of optimum A1/B1/C1/D1 for full Quad channel.
Software Specs:
ESXi 5.1 build 799733
Chilly e1000e net driver vib driver setup - needed for the Intel NIC on the SaberX79
nVidia vib kb2033434 - (looks like it's been removed)
ESXi Customizer
ESXi TGZ2VIB converter
Use the converter to change chilly's network driver from a tgz to a vib.
Use the customizer to make an imager, add chilly's package to the iso.
Rename the Custom.iso to Chilly.iso
Use the customizer on your new custom to make another image, add the nvidia vib this time.
Burn your latest Custom.iso, When I tried to install the nVidia VIB on my initial install I received a there is not enough space to install the module message.
Install the ESXi.....
We'll start off with my machine specs:
PNY GTX 560 Ti 1GB (Primary)
PNY Quadro 4000 2GB GDDR5 (Secondary)
64GB Corsair 1600mHz DDR3 (Running XMP Profile 1)
ASUS Sabertooh X79
Core i7 3930K
Issues with hardware: resolved / replaced mobo there was a bad pin on the CPU socket
Software Specs:
ESXi 5.1 build 799733
Chilly e1000e net driver vib driver setup - needed for the Intel NIC on the SaberX79
nVidia vib kb2033434 - (looks like it's been removed)
ESXi Customizer
ESXi TGZ2VIB converter
Use the converter to change chilly's network driver from a tgz to a vib.
Use the customizer to make an imager, add chilly's package to the iso.
Rename the Custom.iso to Chilly.iso
Use the customizer on your new custom to make another image, add the nvidia vib this time.
Burn your latest Custom.iso, When I tried to install the nVidia VIB on my initial install I received a there is not enough space to install the module message.
Install the ESXi.....
Subscribe to:
Posts (Atom)